How to Build a Slatted Fence – Expert Tips and Advice
Slatted fencing is one of the most popular contemporary boundary and screening options in UK gardens. It delivers partial privacy while allowing light, air and views through, creating a lighter feel than solid closeboard or panel fencing. The clean horizontal or vertical lines pair especially well with composite decking, porcelain paving, rendered walls and modern planting schemes.
There are two main styles:
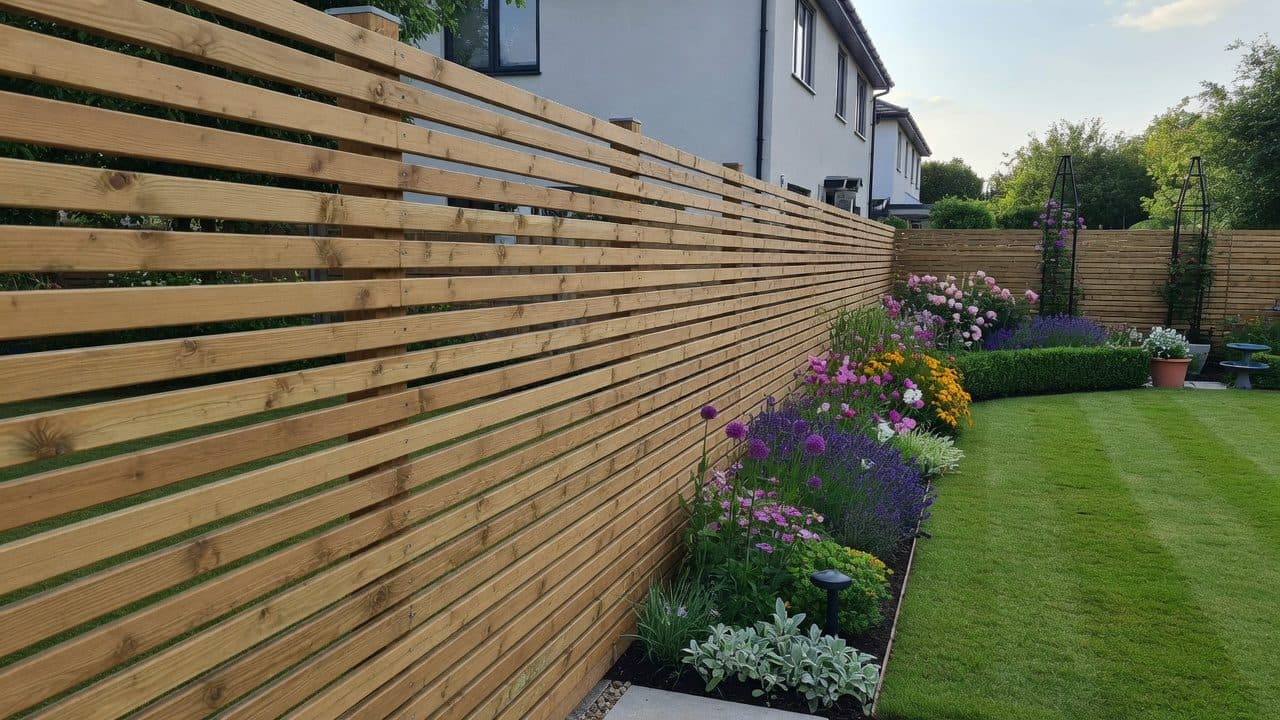
- Horizontal slats (most common contemporary look) — battens fixed across vertical posts.
- Vertical slats — fixed to horizontal rails between posts (closer to the original article structure).
Both can be single-sided or “hit-and-miss” (slats on both faces, offset for greater privacy with good airflow). The guide below focuses on a robust, professional-grade installation suitable for residential gardens in the UK climate, with notes for both orientations.
Planning Permission & Design Decisions
In England, under permitted development rights you can usually erect a fence up to 2 m high in rear and side gardens without planning permission. Next to a highway (including the footpath of a road used by vehicles) the limit drops to 1 m. Height is measured from the higher ground level. Conservation areas, listed buildings, Article 4 directions or covenants can remove these rights — always check with your local authority if in doubt. Trellis toppers count toward the total height.
Key design choices before you start:
- Finished height (typically 1.5–1.8 m for privacy screens).
- Post centres: maximum 1.8 m (prefer 1.5–1.8 m in exposed or windy sites). Wider spans allow softwood battens to bow.
- Slat size and gap: common combinations are 45–94 mm wide battens with 10–20 mm gaps. Narrower gaps + wider boards = more privacy; wider gaps = more decorative screen.
- Calculate number of horizontal slats: height ÷ (slat width + gap). Example: 1800 mm height with 70 mm slats + 15 mm gap ≈ 21–22 rows. Order 5–10 % extra for waste and cutting.
- Orientation and ground conditions (slope, soil type, drainage).
Materials
Posts
- Pressure-treated softwood (Use Class 4 / UC4 for ground contact) 100 × 100 mm for most 1.8 m fences; 75 × 75 mm only for lower or sheltered screens.
- Length: finished height + burial depth (usually 2.4 m posts for a 1.8 m fence).
- Alternatives: concrete posts or steel box section for maximum longevity and minimal movement.
Slats / Battens
- Pressure-treated softwood (PSE planed) — economical, 10–15+ years with maintenance.
- Siberian larch or Western red cedar — better natural durability, stability and appearance (premium option).
- Roofing battens (50 × 25 mm or similar) are a common cost-effective choice for DIY horizontal work.
- Always use exterior-grade, preferably kiln-dried and planed for a clean modern finish.
Other
- Gravel boards (pressure-treated timber or concrete, typically 150 mm high) — strongly recommended. They keep the bottom of the fence clear of soil splash and dramatically extend life.
- Rails (for vertical-slat style): 3 horizontal rails for 1.8 m height (top, middle, bottom).
- Fixings: stainless steel or high-quality galvanised exterior screws (avoid ordinary nails that rust and stain). Pre-drill ends of hardwood or dense softwood to prevent splitting.
- Postcrete / rapid-set post mix (usually 1.5–3 bags per post depending on hole size).
- Optional: capping rail / post caps, end-grain preservative, stain or wood oil.
Tools
String line, spirit level (or laser), tape measure, post-hole digger or spade, saw (circular or mitre preferred), drill/driver, clamps, spacers (cut offcuts to exact gap size), PPE, and temporary braces for posts.
Step-by-Step Installation
1. Mark the fence line and post positions
Run a taut string line between end points. Mark post centres accurately, starting with corners and ends. Divide the remaining distance into even bays (max 1.8 m). Avoid a tiny leftover bay at the end.
2. Dig and set the posts
Dig holes so that roughly one-third of the post length is buried (minimum 600 mm for a standard 1.8 m fence; deeper — 750–900 mm — on exposed, sandy or soft ground). Hole diameter typically 250–300 mm to allow good concrete cover.
Add 50–100 mm of gravel at the base for drainage. Set the post, check plumb on two faces with a spirit level, and align to the string line. Brace temporarily. Fill with Postcrete (or proper concrete mix), slope the top away from the post to shed water, and allow to set fully (follow bag instructions; ideally 24 hours before loading).
3. Fit gravel boards (highly recommended)
Install treated gravel boards between posts at ground level. This single detail prevents the most common cause of early failure — moisture and soil contact at the base.
4. Install rails (vertical-slat style) or prepare for direct fixing (horizontal style)
For vertical slats: fix three horizontal rails between posts (bottom rail ~150 mm above gravel board, top rail near the post tops, one in the middle). Use strong fixings or brackets.
For horizontal slats: you can often fix battens directly to the face of the posts if spacing is ≤ 1.8 m. For extra stiffness or taller fences, add intermediate rails.
5. Attach the slats
- Use consistent spacers (cut timber offcuts or plastic spacers to the exact gap).
- Start either at the bottom (easier for level reference) or top (ensures the most visible line is perfect). Work methodically.
- Pre-drill near ends. Fix with two stainless screws per post/rail intersection where possible.
- Check level and alignment frequently and step back every few rows to spot cumulative errors.
- On slopes, either step the fence in level bays or run continuous parallel lines (stepping usually looks cleaner).
- Leave a small clearance under the bottom slat even with a gravel board.
- Treat any cut ends immediately with end-grain preservative.
6. Finishing
Add a capping rail if desired (sheds water and gives a crisp top line). Fit post caps. Apply stain, oil or preservative once the timber has dried (new treated timber often needs a drying-out period). Two coats on all faces and ends is ideal — doing this before installation is far easier.
Professional Tips & Common Pitfalls
- String lines top and bottom keep the whole run true.
- Inconsistent gaps are the fastest way to make a modern fence look amateur — never eyeball them.
- Softwood battens will move; tighter post spacing and good quality timber reduce problems.
- UC4 posts are non-negotiable for ground contact. UC3 is only for above-ground elements.
- Horizontal lines can make a narrow garden feel wider; vertical lines can emphasise height.
- Combine with planting (climbers, grasses or layered borders in front/behind) for a softer, more established look.
- On windy or coastal sites, reduce post centres and consider concrete or steel posts.
- Hit-and-miss (offset double-sided) gives near-full privacy with excellent airflow and a more interesting appearance from both sides.
Maintenance
Inspect annually. Re-treat every 2–3 years (or as the product requires). Keep the base clear of soil build-up and vegetation. Replace individual damaged slats rather than the whole run when possible.
DIY vs Professional
A straightforward run on level ground is achievable for a competent DIYer with the right tools and patience (expect several days for a decent length). Complex slopes, long runs, gates, or high-specification timber are usually faster and more reliable when done by experienced installers who already have the correct posts, mix and fixing systems on the van.
This approach produces a durable, good-looking fence that performs well in the UK climate and sits comfortably with modern hard landscaping. If you are specifying for a particular project (height, exposure, timber preference or budget), the same principles scale easily.
Related services
Prefer a professional install in Preston & the North West? Explore the services that match this guide.
Enjoyed this guide?